Tuesday, August 16, 2011

Earflaps Beanie for a Toddler


Winter is a great time to make beanies. Especially the ones with earflaps.
I made a couple for my kids who enjoyed them alot. There are lots of free pattern on the internet.
I tried many and finally have come up with this one to suit my girls. I've added embellishment make them extra funkie. If you want to make one. Here's my version of the toodler hat.

Materials: -4ply wool in your favourite colours.
                -6mm  crochet hook
Abbreviations:
ch - chain
dc - double crochet
sl st - slip stitch
dc dec - double crochet decrease
sc dec - single crochet decrease

*Note
dc dec: work a dc without completing the last step (2 loops on hook). In next st, work another dc, and on last step, draw yarn through all three loops on hook.
sc dec: draw up a loop in each st indicated, yo, draw through all loops on hook.

Are you ready...here's goes...

Round 1:Ch4, join to make a ring, ch 3, dc 11.   Join with sl st to third ch in ch 3.

Round 2: Ch 3, dc in same ch. 2 dc in each dc around, join with sl st to third ch in ch 3.


Round 3: Ch 3, dc in same ch. Dc in next dc, *2 dc in next dc, dc in next dc* repeat from * around. Join with sl st to third ch in ch 3.

Round 4: Ch 3, dc around. Join with sl st to third ch in ch 3.

Round 5: Ch 3, dc in same ch. dc in next 2 dcs. *2 dc in next dc, dc in next two dcs* repeat from * around. Join with sl st to third ch in ch 3.
Round 6-9: Ch 3, dc in each dc around. Join with sl st to third ch in ch 3. Do not finish off.
Note:You can add an extra round if you want to make the beanie a bit longer or if your child's head is bigger than average.
First earflap: (Working in third ch of ch 3s as a dc)
Row 1: Ch 3, turn, dc in next 7 dc.
Row 2: Ch 3, turn, dc dec over next two dc, dc in next dc, dc dec over next two dc, dc in next dc, dc dec over last two dc.
Row 3: Ch 3, turn, *dc dec over next two dc,* repeat from * two times.
Row 4: Ch 3, turn, *dc dec over next two dc,* repeat from *.
Row 5: Ch 1, turn, sc dec over three dc. Finish off, weave in ends.

Second earflap: (Working in third ch of ch 3s as a dc)
Join yarn in the 15th st from the joining ch 3s in the main hat. Work towards the front. You can also fold the hat in half to estimate the other earflap on the other side.
Row 1: Join, Ch 3, turn, dc in next 7 dc.
Row 2: Ch 3, turn, dc dec over next two dc, dc in next dc, dc dec over next two dc, dc in next dc, dc dec over last two dc.
Row 3: Ch 3, turn, *dc dec over next two dc,* repeat from * two times.
Row 4: Ch 3, turn, *dc dec over next two dc,* repeat from *.
Row 5: Ch 1, turn, sc dec over three dc. Finish off, weave in ends.
To add the edging, use white or any other colour combination and single crochet around the edge of the hat.
 This photo was taken in better light. Gee i think i need a new camera!
Braided strings:
To add the braided stings cut 12 strings in your desired length.
Take four pieces of yarn together. Put hook through loop on the tip of the earflap, from outside in. Pull a loop of the yarns through, and pull the tail end through the loop. With three groups of two strands of yarn, braid firmly.
Ears:
Cut 12 strings equal length in the colour combinations that you had used.Use the above method to attach the strings to make ears.
Finally add eyes, nose, flower etc...to make the hat extra funky!!
Enjoy everyone!

Thursday, June 2, 2011

Rosie Squares


My family visited me this month. My beautiful sister who is very creative got interested in crocheting flowers. She went searching on the net and found this free pattern . A 3D rose square afghan .
Materials: 4MM crochet hook.
Wool: Pink, Green and white.
Rnd 1: With pink, ch 4, join with a sl st to form a ring.
Rnd 2:
Ch 5, * 1 dc in ring, ch 2, rep from * 6 times more, join with a sl st to 3rd st of ch. 8 ch 2 sps. Rnd 3: * (1 sc, 4 dc, 1 sc), in next ch 2 sp, rep from * 7 times more, join. 8 petals.
Rnd 4:
* ch 4, 1 sc in sc bet next 2 petals, rep from * 6 times more, ch 4, join.
Rnd 5:
* (1 sc, 6 dc, 1 sc) in next ch 4 sp, rep from * 7 times more, join.
Rnd 6:
Rep Rnd 4.
Rnd 7:
* (1 sc, 8 dc, 1 sc) in next ch 4 sp, rep from * 7 times more, join. Fasten off.


Here's a picture of the finsihed  flower. 3 D rose!!!
Adding the green leaves to form the frame for a square. The instructions of this part is a bit confusing so i just follow my own instinct to work out what a square looks like. I did learn how to crochet a cluster. Yay!
Rnd 8: On right side, join green between any 2 petals in a sc, * ch 5, yo twice, insert hook in sc bet next 2 petals, yo and draw up a loop, yo and draw thru 2 loops on hook twice. In same sp, (yo twice, yo and draw up a loop, yo and draw thru 2 loops twice) two times more, yo and draw thru 4 loops – cluster made. Ch 2, make 2 more clusters in same sp. Ch 5, sc in sc bet next 4 petals. Rep from * so that you have 4 groups of 3 clusters – 4 corners. Fasten off.


Rnd 9: Join white in ch 5 sp before any corner, ch 3, 4 dc in same sp, * 2 dc in next ch 2 sp, in center cluster (1 dc, ch 2, 1 dc) (corner), 2 dc in next ch 2 sp, (5 dc in next ch 5 sp) twice, rep from *, ending 5 dc in last ch 5 sp, join. NOTE: A sp will be bet groups of 5 dc's and also groups of 3 dc's before corners.
Rnds 10, 11 & 12:
Ch 3, 4 dc in same joining sp, 5 dc in next sp, * (3 dc, ch 2, 3 dc) in ch 2 corner sp, 5 dc in next sp and each sp to corner sp, rep from * around, join. Fasten off white at end of Rnd 12.
 
Adding the white background. It's so pretty.


Friday, April 15, 2011

Calla Lily Crochet


I have a dear friend who loves the Calla Lily so, i was curious to see if i could find a pattern and make one for fun.
I'd used this pattern and only completed the Calla lily and Pistil part.
I added the stem and made it into a bookmark.
I'm going to try and modify the pattern and make it a little bit smaller and send it to her as a gift.

See if you can have a go. It's so nice.

Here's what the completed flower part looks like.

Adding the pistil to the Lily.

Attaching the pistil to the middle part of the Lily.


Adding the stem.

Wednesday, April 6, 2011

Muno-Amigurumi

I made Muno this week after watching my girls dancing to Yo Gabba Gabba.
The pattern by Soulmom was free from this site.


Wool: Red, white and black
Hook: 3MM

This pattern is done is rounds so i recommend you use a stitch markers to keep track of the rounds.


BODY-Red
rnd 1: 6 sc in magic ring (6)
rnd 2: 2sc in each (12)
rnd 3: *1 sc in next, 2 sc in next, rep from * around (18)
rnd 4: *1 sc in next 2, 2 sc in next, rep from * around (24)
now is a good time to weave in your tail
rnd 5-25: sc in each around (24)

* you can make the body longer by adding extra rounds, i added an extra 5 rounds for my Muno.


CROTCH and LEG - Red

rnd 26: ch 2, sl st to the 13th sc of the last rnd, sc in next 11 and mark the rnd
rnd 27: sc in one side of the first sc, sc in one side of each of the ch 2 sts, sc in the next 11 (14)
rnd 28-40: sc in each around (14)

BOTTOM OF FOOT
To reduce sts in the round instead of skipping a st I would draw a loop through as if to sc and then sc in the next st and draw the hook through all three loops.


rnd 41: slst into next sc, in the back loop- sc in next, reduce around until you get to the center. Leave a long tail
finish: with a yarn needle, work the tail around in the last rnd and pull to the center to close it up tight. Weave in end.

STUFF BODY + LEG
Use some polyester fiber fill to stuff the body and leg until nice and firm, but not hard.

OTHER LEG
Attach yarn with slst in center st of crotch
rnd 1: sc in next 12, sc in the other side of each of the ch 2 spaces, mark rnd (14)
rnd 2-14: sc in each around (14)
Make sure legs look even and adjust number of rnds if needed. Looking even is more important than the actual number of rnds.
STOP-STUFF LEG
rnd 15: rep rnd 41 to close foot.

ARMS - make 2
rnd 1: 6 sc in ring (6)
rnd 2-3: sc in each (6) weave in tail
rnd 4: ch3, sc in each (6)
rnd 5: skip ch3, sc in each (6)
rnd 6-10: sc in each (6)
rnd 11: 2 sc in next, sc in next 5 (7)
rnd 12: sc in each (7)
rnd 13: 2 sc in next, sc in next 6 (8 )
rnd 14: sc in next 3, slst in next 3, sc in next 2 (8 )
rnd 15: sc in next 3, slst in next and finish off
Leave a long tail for sewing onto body.

STUFF ARMS and SEW TO BODY
I used small bits of batting and used the back of my hook to push it down into the arms.
Sew arms to side of body about 1/2 way between the top of the head and the crotch.


FACE
Decide which side of the toy you like better and make that the front. I embroidered the face on but feel free to use any means to create the simple eyeball and a mouth with 2 teeth.


Enjoy!
I'm making another two for my friend's kids!

Wednesday, March 30, 2011

Crochet Heart


Here's a little heart that you could do in 5 minutes.
I got it from this site
Here's how,
Ch 4. Work 3 tr (triple crochet) into first ch, 3 dc, ch 1, 1 tr, ch 1, 3 dc, 3 tr. Ch 3, sl st into center and fasten off.
Enjoy!

Sunday, March 13, 2011

Two Layers Crochet Flower


I added an extra layer to this crochet flower
See if you can try it too. I'm thinking of linking them all up to make a scarf.

Here's how to make it.

Materials.
4 Ply wool (your favourite colours)
3 MM hook


Chain 4, join with slip stitch


Chain 1, *single crochet into the ring, chain 3, repeat from * 3 times, chain 3 and slip stitch to first chain to join. (you can finish here and join a different colour wool if not, you can continue to make the petals the same colour as the centre.)


*Single crochet into the loop, chain 1, 3 double crochet into the same loop, chain 1, single crochet continue from * all the way around in each of the loop. Join to the first chain and finish off.


Join the new colour. Push the petal forward and work in between the petals.


Place hook through the petal's gap then into the centre hole,slip stitch through gaps, chain 1, *single crochet into the ring, chain 3, repeat from * 3 times, chain 3 and slip stitch to first chain to join.


Petals


*Single crochet into the loop, chain 1, 3 double crochet into the same loop, chain 1, single crochet continue from * all the way around in each of the loop. Join to the first chain and finish off. Enjoy


Wednesday, March 9, 2011

Crochet Flower


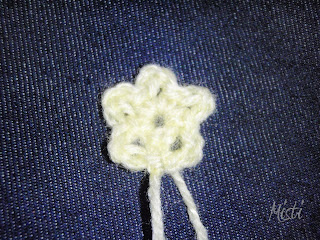
Here's a pattern for a simple 5 petals crochet flower. It's very easy to do and you can use it to make a brooch or add that special touch to a beanie, t-shirt etc...


Materials
4 ply wool (your favourite colours)
3MM hook

Chain 4, join with slip stitch


Chain 1, *single crochet into the ring, chain 3, repeat 3 times, chain 3 and slip stitch to first chain to join. (you can finish here and join a different colour wool if not, you can continue to make the petals the same colour as the centre.)


*Single crochet into the loop, chain 1, 3 double crochet into the same loop, chain 1, single crochet continue from * all the way around in each of the loop. Join to the first chain and finish off.


* Special note, to save you time and energy make sure you try and hide the lose threads/wool as you go by attaching them in stitch that you make.


Click here to learn how to add an extra layer.

Thursday, March 3, 2011

White Totoro


I made these 'tree spirits' after watching 'My Neighbor Totoro'- a 1988 Japanese anime film written and directed by Hayao Miyazaki and produced by Studio Ghibli.
The film follows the two young girls of a professor and their interactions with friendly wood/tree spirits in postwar rural Japan.
The girls in the film remind me of my two little girls. I stumbled across the pattern for the white totoro after a search on utube for the theme song.

My girls are thrilled that they have their own 'tree spirits'.
My next challenge is to make the big one.


White Totoro Crochet Pattern

Materials:
White yarn, double knitting (US sport or worsted?)
Small amount of pink yarn for feet
Small amount of black embroidery thread for eyes
Stuffing
1 pair 9mm black safety eyes
Embroidery needle
3.5mm hook (US E hook)

Abbreviations:
ch = chain
st = stitch or stitches
sc = single crochet (US), double crochet (UK)
hdc = half double crochet (US), half treble (UK)
ss = slip stitch
inc = increase
inc 2 = increase by working 2 sc into one st
dec = decrease
dec 2 = decrease 2 st down to one
FO = finish off

Instructions:
Work in continuous rounds. Most rounds are written in the format:
Round number: [work a number of sc, increase or decrease by one st] x however many times (leaving however many st that round).

Ears (make 2):
1: Ch 2, 4sc into 1st ch, link to 1st sc with slip st.
2: [1sc, inc 2] x 2 (6st)
3: [2sc, inc 2] x 2 (8st)
4-5: Work 8sc for 2 rounds
6: [3sc, inc 2] x 2 (10st)
7-8: Work 10sc for 2 rounds
9: [4sc, inc 2] x 2 (12st)
10: Work 12sc for 1 round
FO one ear only
When second ear is complete join the two ears together at the base by doing round 11 and crocheting 24sc. If there is any gap between them use the tail of yarn from the first ear to neaten up. Continue with the body:
12: [3sc, inc 2] x 6 (30st)
13-15: Work 30sc for 3 rounds
16: [4sc, inc 2] x 6 (36st)
17-27: Work 36sc for 11 rounds
* Fix eyes in now, see below
28: [4sc, dec 2] x 6 (30st)
29: [3sc, dec 2] x 6 (24st)
30: [2sc, dec 2] x 6 (18st)
31: [1sc, dec 2] x 6 (12st)
32: [dec 2] x 6 (6st)
33: [dec 2] until hole is small enough to be sewn closed

Tail:
1: Ch 2, 6sc into 1st ch
2: [1sc, inc 2] x 3 (9st)
3: [2sc, inc 2] x 3 (12st)
4: Work 12sc for 1 round
5: [3sc, inc 2] x 3 (15st)
6: Work 15sc for 1 round, FO

Feet (pink yarn, make 2):
[Ch 4, miss 1, ss into next 3.] x 3
ss into 1st ch to make bird-type foot shape.

Eyes (white yarn, make 2):
1: Ch 2, 8sc into 1st ch, link to 1st sc with slip st, FO. Make sure there is a hole in the centre to put safety eyes through.

*Fit the eyes while there is still room to put your hand inside the body. Put the safety eyes through the centre of the white crocheted parts (you could use circles of white felt). Position on about round 14/15. Stuff fairly well, then complete the body until there is just a small hole left.
Sew edges of white parts of eyes to the body. Use black embroidery thread to outline the eyes.
Stuff body firmly and sew shut.
Stuff tail firmly and sew to body.
Sew feet to body.

http://heavens-hellcat.livejournal.com/730.html

Amigurumi Mouse


So, these are amigurumi mice that took me a day to make. I made them for my girls. They are so cute.

Materials
Size H/5mm Crochet Hook
4-ply wool
Polyester Fiberfill
Tapestry Needle
2 buttons

Abbreviations
SC - Single Crochet
SL ST - Slip Stitch
EA - Each
ST - Stitch
SC DEC - Single Crochet Decrease
MC - Magic Circle
HDC - Half Double Crochet
Single Crochet Decrease - This is where you join 2 single crochet, reducing them down to 1 stitch. Insert the hook in the first stitch, wrap the yarn over, pull it through. There will be 2 loops on the hook. Insert the hook in the next stitch, wrap the yarn over and pull it through the stitch. There will be 3 loops on the hook. Wrap the yarn over the hook and pull through all 3 loops on the hook. This completes the single crochet decrease.

Chain 3, Join.
Round 1: 6 SC in loop, do not join. (6 single crochet total)
The first single crochet will be in the top of the previous round without joining. The remaining project will be worked in a continual round.

Round 2: 2 SC in ea SC around ( 12 single crochet total) Mark the last stitch with a yarn marker.

Round 3: 1 SC in ea SC around (12 single crochet total)

Round 4: *1 SC in the next ST, 2 SC in the next ST. Continue around from* 6 times total. (18 single crochet total)

Round 5-11: 1 SC in ea SC around. (18 Single Crochet total)
Stuff the mouse with fiberfill.

Round 12: Work 9 Single Crochet decrease. (9 Single Crochet total)

Work a couple more single crochet decreases. Cut the yarn and secure the tail by pulling it through the stitch. Weave the needle through the remaining stitch and pull the opening shut. Knot and secure a couple of times. Sew the tail up through the center of the mouse. Cut off any remaining portion of the tail.

Ears: Magic Circle, ch1, pull loop up, Work 6 HDC through the loop. Do not join. Sew the first HDC and last HDC together to shape ear. Knot and secure both tails. Sew to the mouse body. See image for placement

Tail: CH 10, cut yarn. Sew tail to mouse. Weave the tail at the end of the tail through the chains. Knot and secure both tails and sew in to the body.

Eyes: Sew both buttons to the head. Knot and secure the tail and sew in to the body.

Front Feet: Slip stitch yarn to front bottom side of mouse. CH1, SC, turn , SC in previous SC. Cut yarn, knot, secure and hide tails in the mouse body. (Make 2)

Back Feet: Slip stitch yarn to back bottom side of mouse. CH 1, Work 2 SC, *turn, work 1 SC in ea of the 2 SC, Complete 2 times total from *. Cut yarn, knot, secure and hide tails in the mouse body. (Make 2)

Thanks to ...
http://crochet-mania.blogspot.com/2009/03/amigurumi-crochet-mouse.html

My Sunflower Blankie


This is my own sunflower blankie.
To make this blankie you need to know how to crochet a basic granny square and
the sunflower granny square.

You will need to make 12 green squares, 12 yellow squares and 15 sunflower squares.
Use sc to join the pieces together.

Granny Square


Here's the pattern to make your granny squares.

Round 1

1 – Make a slip knot

2 – Chain 5

3 – Insert hook into 1st chain to make a circle. Connect with a slip stitch.

4 – Chain 2

5 – Double crochet in circle 2 times (first chain 2 counts as a double crochet)

6 – Chain 2

7 – 3 double in circle

8 - Chain 2

9 – 3 double crochet in circle

10 – Chain 2

11 – 3 double crochet in circle

12 – Ch 2 connect to top of first chain 2 with a slip stitch. (First round completed) (You can change colour here or continue with the same colour, you won't need to finish off)

Round 2

1 – Chain 2 turn work

2 – 2 double crochet – chain 2 – 3 double crochet ((corner cluster made)

3 – Chain 1 (this is one side of square)

4 – 3 double crochet – chain 2 – 3 double crochet (next corner cluster made)

5 – Chain 1 (next side)

6 – 3 double crochet – chain 2 – 3 double crochet (3td corner cluster made)

7 – Chain 1 (side again)

8 – 3 double crochet – chain 2 – 3 double crochet (4th corner cluster completed)

9 – Chain 1 – connect with slipstitch to the top of first chain 2

Round 3 and as many rounds as you wish your square to be.

Repeat second round adding a cluster in the middle of each side row, with every additional round you make.